Jared Wilber | 21 August, 2019
Thanks to recent-ish developments in the tidyverse (namely purrr and tidyr), it's very easy to create nested workflows for data analysis in R. In one sentence, the goal of this approach is to keep all related things together in a single dataframe. So while dataframes in a typical workflow will store just data, we'll explore using dataframes to store all objects, data, and parameters representing the different stages of our workflow.
The idea is simple, if a little weird, but it's quite powerful for the following reasons:
To present the idea, I'll use a common machine-learning workflow as a running example: trying out different data-preprocessing and model combinations. This workflow (presented in similar fashion in [1]) comprises multiple stages of data analysis and thus lends itself well as an example of nested workflows.
This idea is not my own. Rather, what I'm presenting is a combination of things I've learned online, in books, at conferences, and from my own experimentation. Check out stuff from people smarter than me in the Referenes & Related Work at the bottom for more.
Note - I assume you already have an intermediate understanding of both R and machine learning.
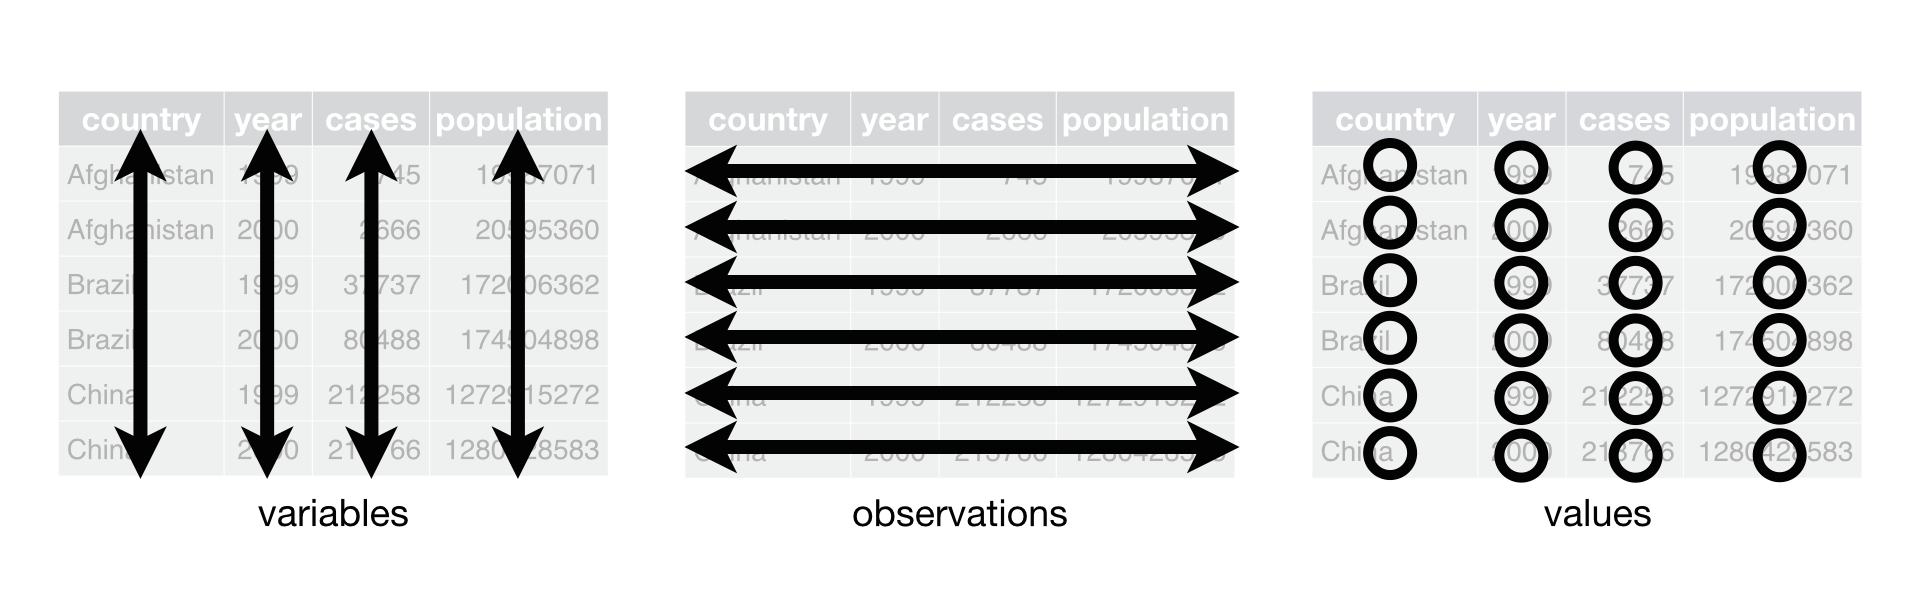
As a quick recap, tidy data refers to a consistent data structure as follows:
Structuring our data in a tidy format provides an intuitive mental model for analysis, keeps both code and data objects organized, and allows us to work with tidyverse functions. [2]
As a running example, we'll look at nutriotional data from the US McDonald's menu [3]: to see if we can predict an item's category (e.g. Breakfast, Desserts, Snacks & Sides) from its nutritional content (e.g. Calories, Total Fat, Sodium):
# load libraries
library(caret)
library(tidyverse)

# load data, removing non-nutritional columns
menu <- read_csv('menu.csv') %>%
  select(-Item, -`Serving Size`)
menu

# A tibble: 260 x 22
   Category Calories `Calories from ~ `Total Fat` `Total Fat (% D~ `Saturated Fat` `Saturated Fat ~ `Trans Fat` Cholesterol
   <chr>       <dbl>            <dbl>       <dbl>            <dbl>           <dbl>            <dbl>       <dbl>       <dbl>
 1 Breakfa~      300              120          13               20               5               25           0         260
 2 Breakfa~      250               70           8               12               3               15           0          25
 3 Breakfa~      370              200          23               35               8               42           0          45
 4 Breakfa~      450              250          28               43              10               52           0         285
 5 Breakfa~      400              210          23               35               8               42           0          50
 6 Breakfa~      430              210          23               36               9               46           1         300
 7 Breakfa~      460              230          26               40              13               65           0         250
 8 Breakfa~      520              270          30               47              14               68           0         250
 9 Breakfa~      410              180          20               32              11               56           0          35
10 Breakfa~      470              220          25               38              12               59           0          35
# ... with 250 more rows, and 13 more variables: `Cholesterol (% Daily Value)` <dbl>, Sodium <dbl>, `Sodium (% Daily
#   Value)` <dbl>, Carbohydrates <dbl>, `Carbohydrates (% Daily Value)` <dbl>, `Dietary Fiber` <dbl>, `Dietary Fiber (% Daily
#   Value)` <dbl>, Sugars <dbl>, Protein <dbl>, `Vitamin A (% Daily Value)` <dbl>, `Vitamin C (% Daily Value)` <dbl>, `Calcium
#   (% Daily Value)` <dbl>, `Iron (% Daily Value)` <dbl>
These nested workflows are built upon a tidy data structure called the list-column [4]. Whereas typical dataframes are populated with atomic vectors, list-columns allow us to nest any R object (e.g. other dataframes, S3 objects, etc.) inside our dataframe. To begin, we'll use tidyr:enframe to nest our data with an accompanying index column:
# nest original data
menu <- rep(list(menu), 4) %>%
  enframe(name = 'index', value = 'data')
menu

# A tibble: 4 x 2
  index data
  <int> <list>
  1     1 <tibble [260 x 22]>
  2     2 <tibble [260 x 22]>
  3     3 <tibble [260 x 22]>
  4     4 <tibble [260 x 22]>
At this stage, our nested dataframe holds pointers to our original dataframe four times (one for each transformation value below), with an associated index for each one.
The purrr package in R provides a bunch of functional tools for iteration, and we'll make heavy use of these to grow our dataframe.
For presentation, we'll create our own function for feature transformation, power_transform(), which will allow us to apply a basic power transformation[5] to all numeric features in our dataframe:
# function to apply a given power-transform to numerical columns
power_transform <- function(df, pow) {
  df %>%
    mutate_if(~ is.numeric(.x),
              ~ `^`(.x, pow)) %>%
    select(-Category)
}
Next, we'll use purrr's map functions to easily extend our nested dataframe with a new list-column representing our desired power transformations. Because we want to apply and keep track of a number of different power transformations, we'll create two new columns:
power: The power used for power transformations.trns_data: Our original dataframe with the corresponding power transformation applied.purrr, this process is very easy. First, we use purrr:map2() to apply our user-defined function to two arguments in a row-wise manner: the data column and the power column. Then we create the label column with simple use of purrr's handy name shortcut[6] functionality.
# add 3 columns to data: power, transformed_data, and label
menu <- menu %>%
  mutate(
    power = c(0.5, 1, 2, 3),
    transformed_data = purrr::map2(data, power, ~ power_transform(.x, .y)),
    label = purrr::map(data, 'Category')
  )
menu

  # A tibble: 4 x 5
  index data                power trns_data           label
  <int> <list>              <dbl> <list>              <list>
1     1 <tibble [260 x 22]>   0.5 <tibble [260 x 21]> <chr [260]>
2     2 <tibble [260 x 22]>   1   <tibble [260 x 21]> <chr [260]>
3     3 <tibble [260 x 22]>   2   <tibble [260 x 21]> <chr [260]>
4     4 <tibble [260 x 22]>   3   <tibble [260 x 21]> <chr [260]>
At this stage, our dataframe holds the original data and the transformed data, as well as columns for our label and each power transformation value.
purrr.
caret package [7] , which simply wraps different algorithm implementations in R with a consistent API.
In particular, we'll take advantage of the uniform syntax provided by caret and create ourselves a machine learning function factory:
# machine learning model function factory
mlFuncFact <- function(ml_method) {
  function(data, label) {
   caret::train(
      x = data,
      y = label,
      method = ml_method
    )
  }
}
# create list of models
model_df <- list(
  decision_tree = mlFuncFact('rpart2'),
  random_forest = mlFuncFact('ranger'),
  boosted_log_reg = mlFuncFact('LogitBoost'),
  knn = mlFuncFact('knn'),
  svm = mlFuncFact('svmLinear3'),
  lda = mlFuncFact('lda')
  ) %>%
  enframe(name = 'model', value = 'model_func')
model_df

  # A tibble: 6 x 2
  model           model_func
  <chr>           <list>
1 decision_tree   <fn>
2 random_forest   <fn>
3 boosted_log_reg <fn>
4 knn             <fn>
5 svm             <fn>
6 lda             <fn>
Next, we combine our models and our transformed data into a single data-frame. Recall we want to run all pairs of power transformations and machine learning algorithms. In other words, we want the cartesian product (also known as a cross-join) of power transformations and machine learning algorithms.
Luckily for us, tidyr provides this functionality via the crossing() function:
# cross-join original data with models
menu <- menu %>%
  crossing(model_df) %>%
  arrange(model, power)
menu

  # A tibble: 24 x 7
   index data                power trns_data           label       model           model_func
   <int> <list>              <dbl> <list>              <list>      <chr>           <list>
 1     1 <tibble [260 x 22]>   0.5 <tibble [260 x 21]> <chr [260]> boosted_log_reg <fn>
 2     2 <tibble [260 x 22]>   1   <tibble [260 x 21]> <chr [260]> boosted_log_reg <fn>
 3     3 <tibble [260 x 22]>   2   <tibble [260 x 21]> <chr [260]> boosted_log_reg <fn>
 4     4 <tibble [260 x 22]>   3   <tibble [260 x 21]> <chr [260]> boosted_log_reg <fn>
 5     1 <tibble [260 x 22]>   0.5 <tibble [260 x 21]> <chr [260]> decision_tree   <fn>
 6     2 <tibble [260 x 22]>   1   <tibble [260 x 21]> <chr [260]> decision_tree   <fn>
 7     3 <tibble [260 x 22]>   2   <tibble [260 x 21]> <chr [260]> decision_tree   <fn>
 8     4 <tibble [260 x 22]>   3   <tibble [260 x 21]> <chr [260]> decision_tree   <fn>
 9     1 <tibble [260 x 22]>   0.5 <tibble [260 x 21]> <chr [260]> knn             <fn>
10     2 <tibble [260 x 22]>   1   <tibble [260 x 21]> <chr [260]> knn             <fn>
# ... with 14 more row
Boom! There it is - our dataframe with everything stored together. Now let's solve these models and see which one is the best.
To get our results, we'll once again take advantage of purrr's map capabilities. In this case, we'll create a new list column by invoking our machine learning functions with separate parameters. This invocation of multiple functions over multiple sets of parameters requires using purrr::invoke_map ( Note, invoke_map() is now retired, but will exist forever. I prefer it to the more complicated combination of map, exec, and !!!, which I added below as a comment for completeness):
# evaluate models
menu <- menu %>%
  mutate(
    model_params = map2(transformed_data, label, ~ list(data = .x, label = .y)),
    model_trained = invoke_map(model_func, model_params) # equivalent to map2(model_func, model_params, ~ exec(.x, !!!.y))
  )
menu

  # A tibble: 24 x 9
   index data                power trns_data           label       model           model_func model_params     model_trained
   <int> <list>              <dbl> <list>              <list>      <chr>           <list>     <list>           <list>
 1     1 <tibble [260 x 22]>   0.5 <tibble [260 x 21]> <chr [260]> svm             <fn>       <list [2]>       <S3: train>
 2     2 <tibble [260 x 22]>   1   <tibble [260 x 21]> <chr [260]> random_forest   <fn>       <list [2]>       <S3: train>
 3     1 <tibble [260 x 22]>   0.5 <tibble [260 x 21]> <chr [260]> boosted_log_reg <fn>       <list [2]>       <S3: train>
 4     1 <tibble [260 x 22]>   0.5 <tibble [260 x 21]> <chr [260]> random_forest   <fn>       <list [2]>       <S3: train>
 5     4 <tibble [260 x 22]>   3   <tibble [260 x 21]> <chr [260]> boosted_log_reg <fn>       <list [2]>       <S3: train>
 6     2 <tibble [260 x 22]>   1   <tibble [260 x 21]> <chr [260]> boosted_log_reg <fn>       <list [2]>       <S3: train>
 7     3 <tibble [260 x 22]>   2   <tibble [260 x 21]> <chr [260]> boosted_log_reg <fn>       <list [2]>       <S3: train>
 8     3 <tibble [260 x 22]>   2   <tibble [260 x 21]> <chr [260]> random_forest   <fn>       <list [2]>       <S3: train>
 9     4 <tibble [260 x 22]>   3   <tibble [260 x 21]> <chr [260]> random_forest   <fn>       <list [2]>       <S3: train>
10     2 <tibble [260 x 22]>   1   <tibble [260 x 21]> <chr [260]> svm             <fn>       <list [2]>       <S3: train>
# ... with 14 more rows
Thankfully we used caret, so we can extract the metrics from all of our models in one easy go:
# extract results for each model
trained_models <- menu %>%
  mutate(
    accuracy = map_dbl(model_trained, ~max(.x$results$Accuracy)),
    accuracySD = map_dbl(model_trained, ~max(.x$results$AccuracySD)),
  ) %>%
  arrange(desc(accuracy))

trained_models %>%
  select(power, model, accuracy)

  # A tibble: 24 x 11
   index data              power trns_data          label       model         model_func model_params    model_trained  accuracy accuracySD
   <int> <list>            <dbl> <list>             <list>      <chr>         <list>     <list>          <list>        <dbl>      <dbl>
 1     1 <tibble [260 x 2~   0.5 <tibble [260 x 21~ <chr [260]> svm           <fn>       <list [2~       <S3: trai~    0.828     0.0545
 2     2 <tibble [260 x 2~   1   <tibble [260 x 21~ <chr [260]> random_forest <fn>       <list [2~       <S3: trai~    0.822     0.0506
 3     1 <tibble [260 x 2~   0.5 <tibble [260 x 21~ <chr [260]> boosted_log_~ <fn>       <list [2~       <S3: trai~    0.821     0.0544
 4     1 <tibble [260 x 2~   0.5 <tibble [260 x 21~ <chr [260]> random_forest <fn>       <list [2~       <S3: trai~    0.820     0.0376
 5     4 <tibble [260 x 2~   3   <tibble [260 x 21~ <chr [260]> boosted_log_~ <fn>       <list [2~       <S3: trai~    0.816     0.0534
 6     2 <tibble [260 x 2~   1   <tibble [260 x 21~ <chr [260]> boosted_log_~ <fn>       <list [2~       <S3: trai~    0.815     0.0437
 7     3 <tibble [260 x 2~   2   <tibble [260 x 21~ <chr [260]> boosted_log_~ <fn>       <list [2~       <S3: trai~    0.815     0.0490
 8     3 <tibble [260 x 2~   2   <tibble [260 x 21~ <chr [260]> random_forest <fn>       <list [2~       <S3: trai~    0.813     0.0486
 9     4 <tibble [260 x 2~   3   <tibble [260 x 21~ <chr [260]> random_forest <fn>       <list [2~       <S3: trai~    0.805     0.0393
10     2 <tibble [260 x 2~   1   <tibble [260 x 21~ <chr [260]> svm           <fn>       <list [2~       <S3: trai~    0.766     0.112
# ... with 14 more rows
Alright, there you have it - a tidy dataframe with all steps of our analysis, where all related objects are stored together. No more namespace pollution. No more confusing, intermediary dataframes. No more clutter.
A big benefit of this style of R programming is that everything is stored in a tidy format. This allows us to easily pursue further analysis on our data using tidy packages. For example, we can easily pipe our results into ggplot2 to visually compare our results:
# plot model accuracies
library(ggplot2)

trained_models %>%
  ggplot(aes(x = as.factor(power), colour = model)) +
  geom_point(aes(y = accuracy), size = 2) +
  geom_errorbar(aes(ymin = accuracy - accuracySD,
                    ymax = accuracy + accuracySD)) +
  theme_classic() +
  facet_wrap(~model)

So yeah, next time you're writing some R code, give purrr and tidyr a shot. They're pretty cool.